Mozilla Thunderbird 31.0 Advanced Setup Guide
Recently, we’ve been hearing lots reports of people having various problems configuring and setting up their email accounts using varying range of email clients. This guide will be the one of a series of guides which aims to help you through the process of configuring your email client to receive emails from your email account. Additionally, it will also show you additional useful settings and features which may help enhance your experience when using these email clients.
Today, we will be looking at my personal favourite email client, Mozilla Thunderbird. The version which I will be using in this guide is version 31.0. The steps in this guide may be similar to older versions of Thunderbird however, I cannot guarantee that they will be the same.
This guide is aimed at advanced users with an greater understanding of computing, if you wish to view a beginner setup guide, please look at this guide.
Mozilla Thunderbird 31.0
Setup
For most users, the process of connecting your email account to the email client should be fairly straightforward. As long as you know the basic details of your email server and email account, you should be able to set up the email client with very little hassle. Upon loading Thunderbird, you will be presented with your local folder list. In this menu, you will be able to add your email account to the email client.
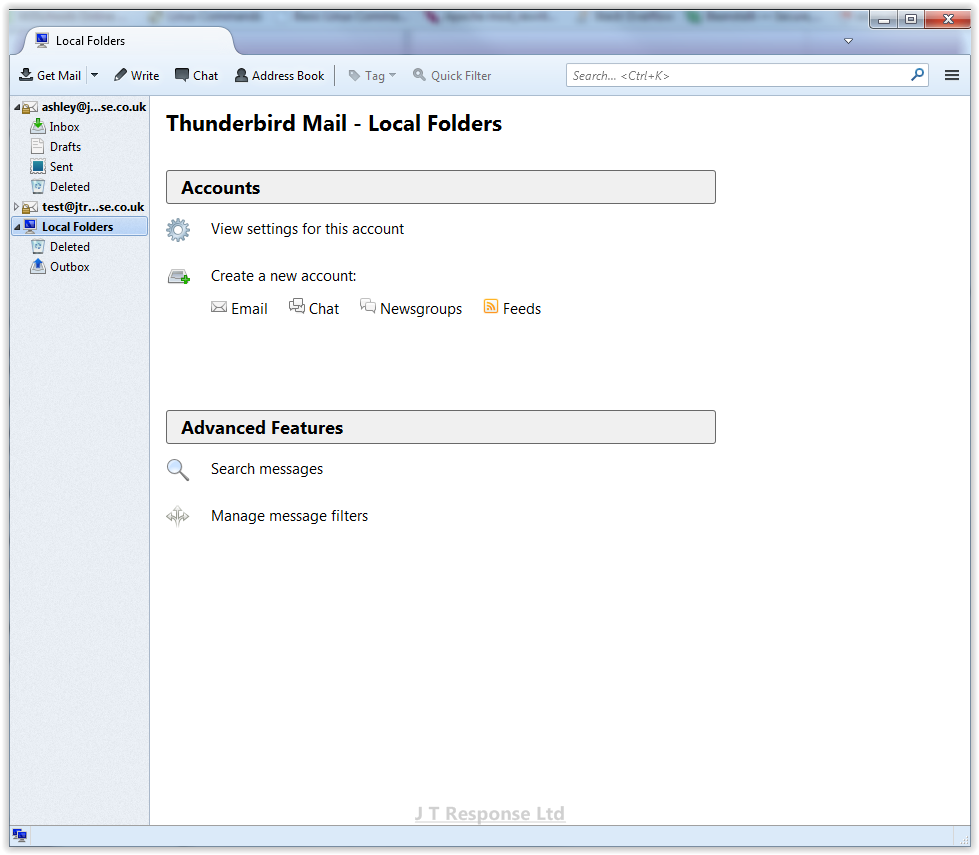
Automatic Email Account Setup
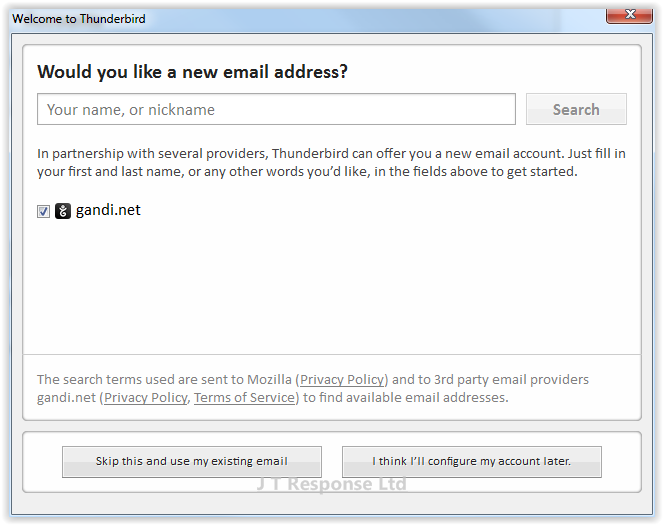
To add your email account to the email client, go to the Local Folders tab which should be displayed by the email client. This should bring up a menu with various options for you to choose from. Select the Create a new account section and press the email button. This will bring up a window prompting you to create a new email address. As we already have our email account, we want to ignore this window and press the button at the bottom of the window marked Skip this and use my existing mail to add our existing account to the email client.
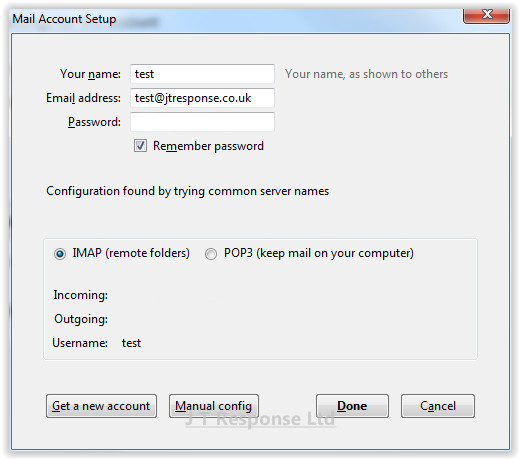
This will now bring up a window whereby we can enter our email account settings. There are several fields which you are required to complete in order to connect to your email account:
- Your Name:This should be your full name. This name is which Thunderbird will tie to your email address and will be displayed alongside your email address to your email recipients.
- Email Address: This must be the email address which you wish to configure with Thunderbird. This is the email address which Thunderbird will use to find your email server and attempt to connect to.
- Password: This password is the password which is assigned to your email address and the one which you would usually use to log in to that email account. This password must match in order to successfully connect to your email server.
Once you have completed the form, press the continue button. This will make Thunderbird search for your email server settings and will try to make a connection with your email account.

The screenshot below shows that we have successfully connected to the email account using the entered details. The email server and account details are listed in this window. Verify that these details are correct for your email server and if so, press the Done button. Your email account should now be successfully connected to the Thunderbird email client.
Manual Email Account Setup
If you wish to manually connect to your email account from the Thunderbird client, you must first attempt to connect to it manually. Please refer to the Automatic Email Account Setup section for steps to do this. Once you reach the final screen in the automatic setup, press the Manual config button at the bottom of the window to open the manual configuration window for email account setup.
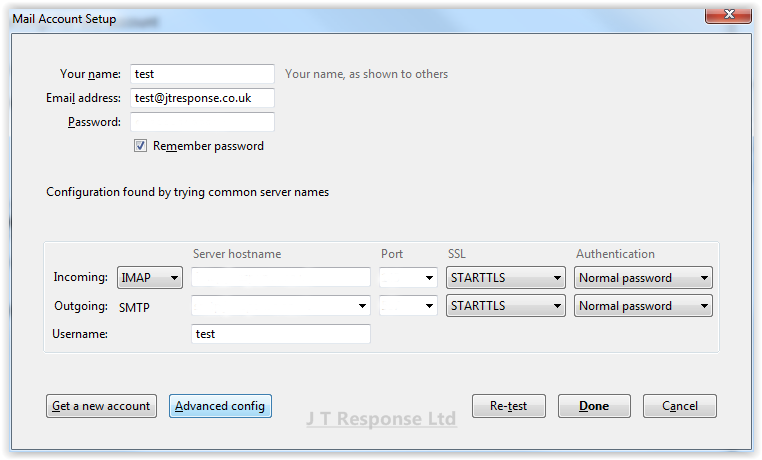
Here you can change all of the email server settings which were imported automatically by Thunderbird. Once you have entered the correct email server and account details, press the Done button and you should be able to connect to your email client. In this window, there are more fields which need to be completed in order to manually connect to your email account.
Incoming Server
- Protocol: This is the drop down menu next to the Incoming header. Here you can select the type of protocol which your email uses. The options here are POP3 or IMAP.
- Host name: This is the host name of the incoming email server.
- Port: This is the port which is used by the incoming server.
- SSL: This is the method of Secure Sockets Layer (SSL) to use for the incoming server. The options available here are: Autodetect, None, STARTTLS or SSL/TLS.
- Authentication: This is the method of authentication used by the incoming server. The options available here are: Autodetect, Normal Password, Encrypted Password, Kerberos/GSSAPI or NTLM.
- Username: You may be required to specify the username which will be used to connect to the incoming server.
Outgoing Server
- Host name: This is the host name of the outgoing email server.
- Port: This is the port which is used by the outgoing server.
- SSL: This is the method of Secure Sockets Layer (SSL) to use for the outgoing server. The options available here are: Autodetect, None, STARTTLS or SSL/TLS.
- Authentication: This is the method of authentication used by the outgoing server. The options available here are: Autodetect, No Authentication, Normal Password, Encrypted Password, Kerberos/GSSAPI or NTLM.
- Username: You may be required to specify the username which will be used to connect to the outgoing server.
Features
Now that you have your email account configured with Mozilla Thunderbird, there are several features which may prove helpful to you during your time using this email client.
Create Rule
The first feature which we will be looking at are rules. Rules are used to tell Thunderbird to perform a particular action when a certain criteria is met. An example of such a rule is to forward specified emails to an email address when they are received by the email client. Rules can help expand and automate what the email client does and can help tailor your email client to suit your needs.
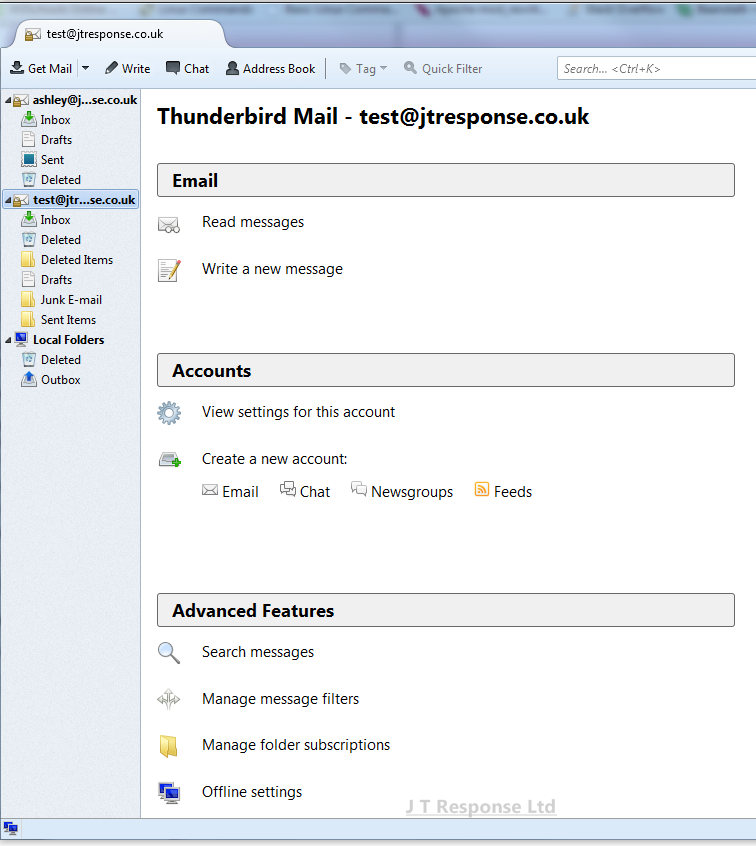
To set rules in the Thunderbird client, you must click on your email account in the sidebar to the left of the window. This will display you with several options to do with managing your account and email client. From here you should press the Manage message filters button under the Advanced Features heading on the page. This will open a list of current message filters which are associated with your email account.
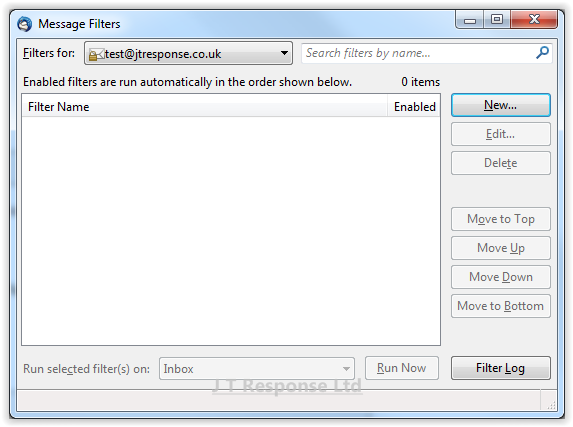
In order to create a new rule, we need to press the New button on the right of the window. This will open up another window whereby we can manage the details of the rule.
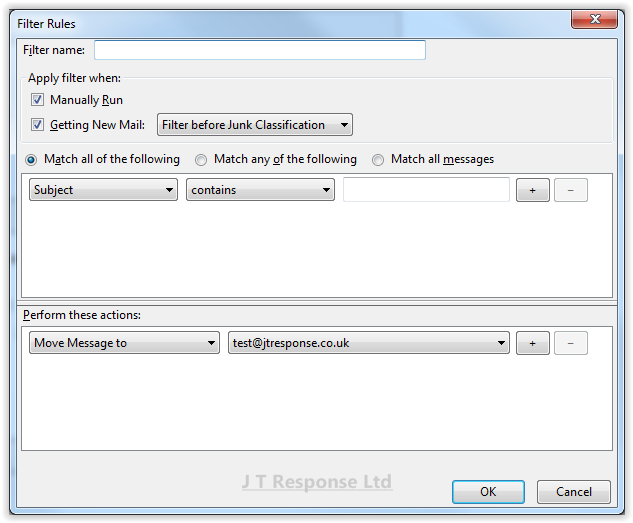
By pressing the New button, the window above should be displayed. This window will display all of the information about the rule you are creating. At the top of the window, you can enter the name of the filter you wish to create. Below this, you can specify when the filter is run and whether the filter is run before or after junk classification. After this come the core elements of the filter, the conditions and the actions.
The first box is a list of conditions that a message must meet to activate the rule. These conditions are the WHEN part of the rule, specifying when action must be taken. There are several options as to whether messages must meet all of the conditions or whether they can meet only one or more of the conditions in order to activate the rule. The first drop down contains the type of condition which is to be met. The second drop down specified what condition is being applied to the condition type. The final box is used to specify the exact condition which must be met. The plus button will add a new condition and the minus button will remove a rule. A clearer example of creating a rule in action can be seen in the spam rule example.
The second box is a list of actions which will be taken on messages which meet the conditions. These actions are the WHAT part of the rule, specifying what action is taken on messages which meet the conditions. The first drop down contains a list of action types. The second drop down is used to further specify what action is taken. The plus button is used to add new actions to the rule. The minus button is used to remove actions from the rule.
Once you are satisfied with the rule which you have created, press the OK button to enable the rule within your email client.
Spam Rule Example
In this example, I will be showing you how to create a rule which will automatically deal with any spam received by your email client. The way we will be doing this is by looking into the email headers received with the message. The email header contains all the necessary information required to ensure that your email is routed to the correct email server and account, as well as providing vital information such as who the email was from. In addition to these details, the anti-spam methods put in place by the email server will add additional lines in the header to score email messages in an attempt to prevent spam. These headers are what we will be looking at in this example.
In our email server, spam is given a score based on various factors. If the spam score for a given message is greater than 6, it will be flagged as spam and appropriate actions can be taken by the email client.
To create our rule, we will once again go to our email account in the left sidebar and press the Manage message filters button. In the window that pops up, we wish to create a new rule, so we press the New button on the right side of the window.
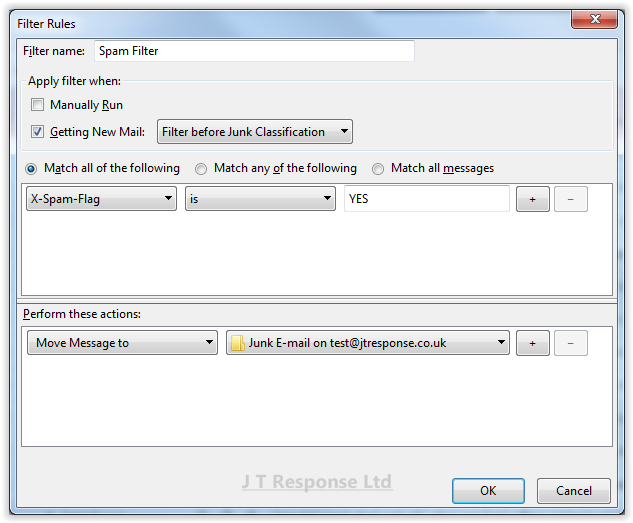
We will name our rule Spam Filter as it seems to be a relevant name to give to a rule of this type. The header we will be looking at in messages is called X-Spam-Flag and will have a value of either YES or NO, depending on the message spam score. If the message spam score is higher than 6, the X-Spam-Flag will have a value of YES.
For our rule, we wish messages which have a X-Spam-Flag value of YES to be caught, so we must go to the first drop down, select Customize and then enter the email header we wish to look at, which is X-Spam-Flag. Next we must specify that the value must be equal to the value entered in the box. In the box, we should enter the value of YES, as this is what we are looking for in the header.
Next we must specify what action we would like to be taken. In this example, we wish to move all messages marked as spam to the Junk folder. To do this we must choose the Move Message To option from the first drop down menu. Next we must choose the folder we wish to move the messages to in the second drop down menu. In this example we want the Junk folder, so we choose that in the drop down menu. Our rule is now complete and we can press OK to finalise the setting of this rule.
Summary
I hope that this guide will help you to setup, configure and use Mozilla Thunderbird 30.0. Most of the steps taken in this guide should be similar for other versions of Thunderbird but I cannot guarantee this, therefore if you are using a different version, please follow these steps at your own risk. If you have any questions about this guide, please comment below and I will be happy to assist you.
Date: August 20, 2014
Category: Email Client Guides
Author: Ashley Peck
Tags: 31.0, advanced, client, configuration, email, guide, IMAP, mozilla, POP3, rules, setup, SMTP, spam, thunderbird