Apple Mail 7.3 Advanced Setup Guide
Recently, we’ve been hearing more reports of people having various problems configuring and setting up their email accounts using varying range of email clients. This guide will be one of a series of guides which aims to help you through the process of configuring your email client to receive emails from your email account. Additionally, it will also show you additional useful settings and features which may help enhance your experience when using these email clients.
Today, we will be looking at Apple Mac’s default email client, Mail. The version which I will be using in this guide is version 7.3. The steps in this guide may be similar to the older versions of Mail however, I cannot guarantee that they will be the same.
This guide is aimed at advanced users with an greater understanding of computing, if you wish to view a beginner setup guide, please look at this guide.
Apple Mail
Setup
For most users, the process of connecting your email account to the email client should be fairly straightforward. As long as you know the basic details of your email server and email account, you should be able to set up the email client with very little hassle. Upon loading Mail for the first time, you will be presented with a window asking what mail account you wish to add to the email client.
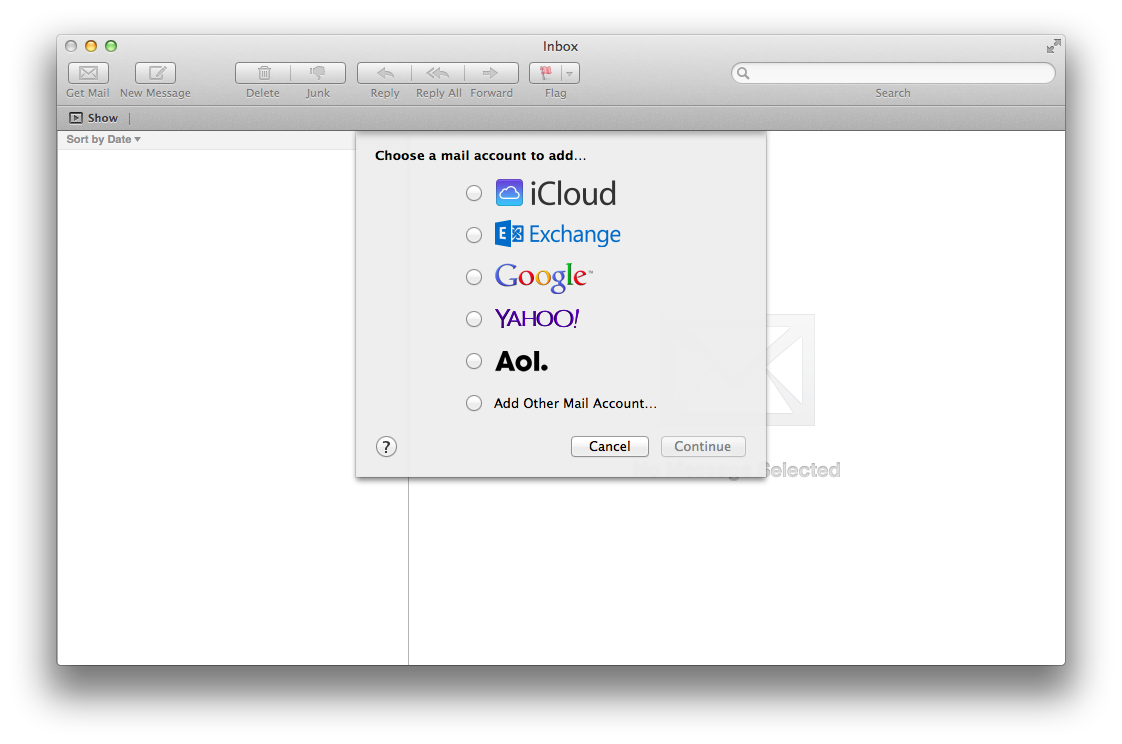
During this guide, we will be adding your email account to Mail. Therefore, we will want to press the Add Other Mail Account… radio button at the bottom of the list and press Continue.
Automatic Email Account Setup
The way in which Mail works is by attempting to connect to your email account automatically at every point during the setup process. If automatic setup fails, Mail will prompt you to manually enter some details in order to help it locate your mail server and connect to your email account. As such, I cannot provide an ‘Automatic’ email setup guide as this will depend on your email server configurations and whether Mail is able to easily find your email server. Due to this, I will write the setup guide for both automatic and manual in the ‘Manual Email Account Setup’ section of this guide, although Mail may be able to automatically configure itself at several points during the process.
Manual Email Account Setup
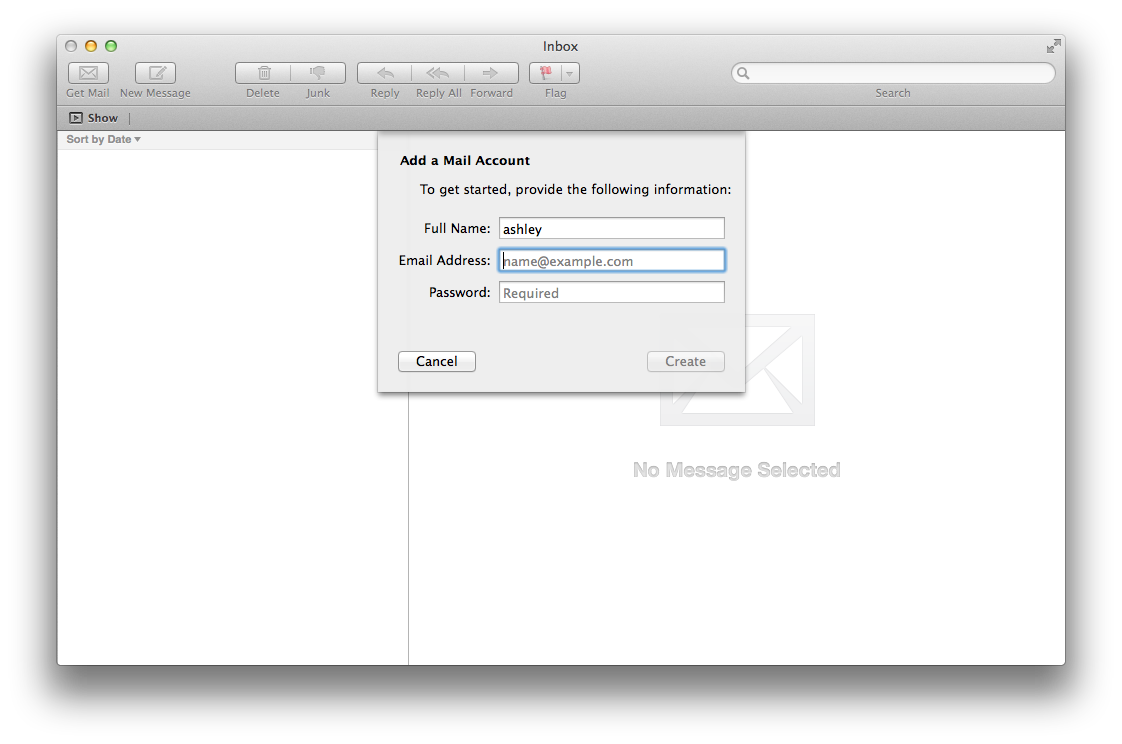
We are now presented with a form to fill out in order to connect to our email account via Mail. The email client requires several fields in order to try to connect to the email account automatically.
- Full Name: This should be your full name. This name is which Mail will tie to your email address and will be displayed alongside your email address to your email recipients.
- Email Address: This must be the email address which you wish to configure with Mail. This is the email address which Mail will use to find your email server and attempt to connect to.
- Password: This password is the password which is assigned to your email address and the one which you would usually use to log in to that email account. This password must match in order to successfully connect to your email server.
Upon pressing the Create button, Mail will try to connect to your email account. If it succeeds, you will be presented with your email inbox. However, it Mail is unable to connect to your email account, it will display a message stating Account must be manually configured. In this case, Mail required additional information from you in order to add your email account.
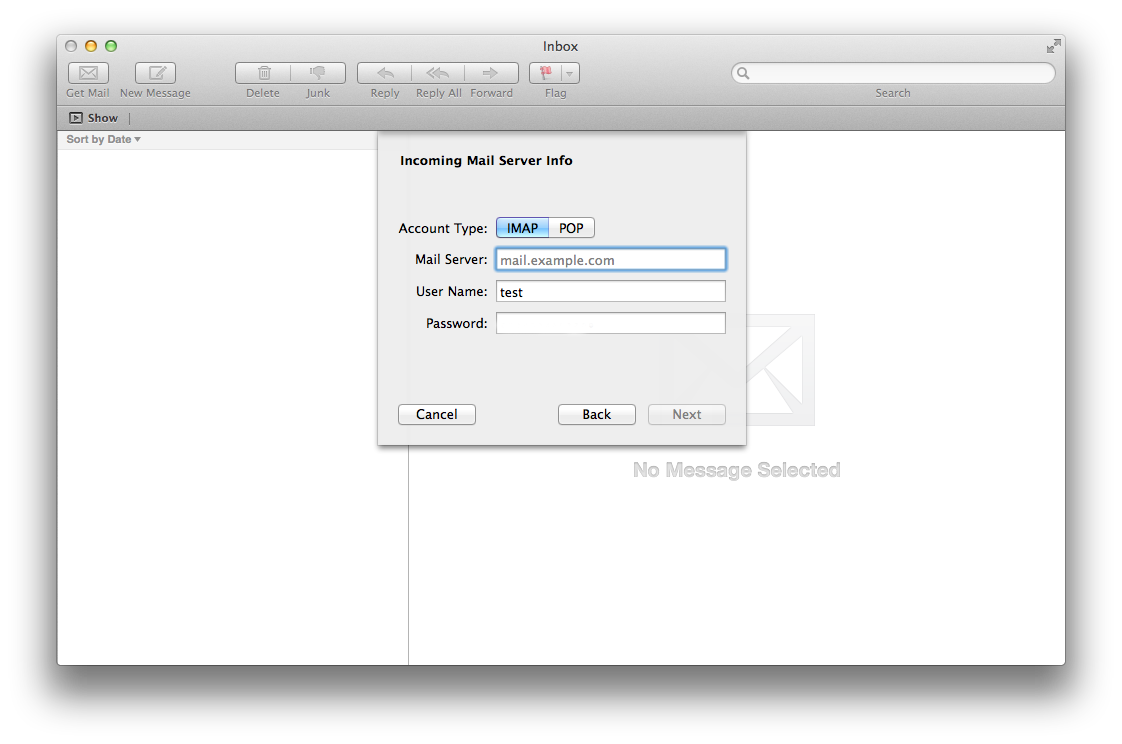
The next screen will be asking you for incoming mail server information. This information is required by Mail in order to connect to the incoming mail server tied to your email account. This screen will ask you for several pieces of information.
- Account Type: This is the type of protocol which your incoming email server uses. The options here are either IMAP or POP.
- Mail Server: This is the host name of your incoming mail server.
- User Name: This is the user name of your email account and what you would typically use when logging on to your email account.
- Password: This is the password associated with your username. Typically this would be the same as the password you would use to log in to your email account with.
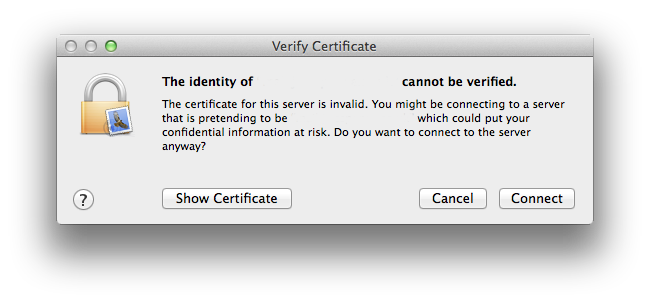
Once you have completed all of this information, press the Next button. You may be asked to verify the certificate of your incoming mail server. If you believe that you are connecting to the correct server and the certificate is correct, press Connect to continue connecting. At this point, Mail will try again to connect to your email server automatically. If it succeeds, you will be taken to a screen asking you to enter outgoing server information. However, if it continues to fail, you will be asked to enter additional account information in order to assist Mail to connect. If this is the case, Mail will display the message Additional account information required to you in the current window.

You will now be asked to input additional incoming mail server information. This information is required to assist Mail to connect to your account. You will be asked for several pieces of information.
- Path Prefix: This is the path prefix to be added to the server host name. In most circumstances this should be left blank, unless it is specifically needed or required by the email client.
- Port: This is the port which the incoming mail server used to connect.
- Use SSL: This specifies whether the incoming mail server uses a Secure Socket Layer (SSL).
- Authentication: This specifies the method of authentication that the incoming server uses.The options available here are: Password, MD5, NTLM, Kerberos or None.
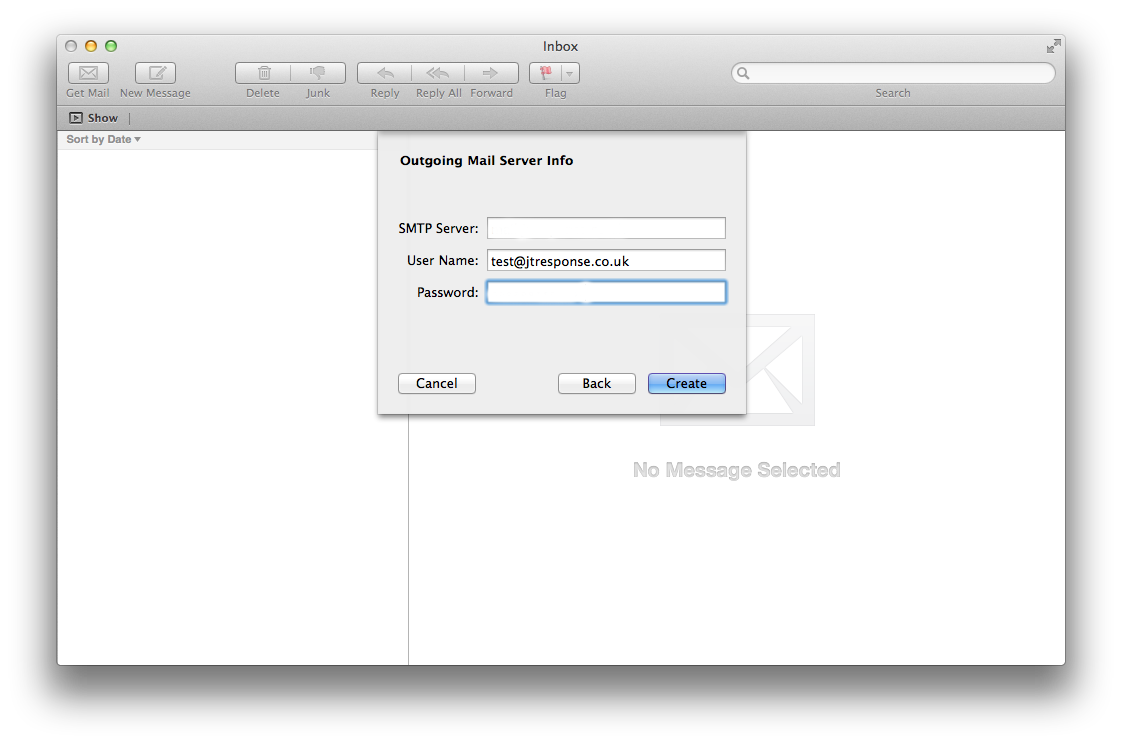
The next screen will be asking you for outgoing mail server information. This information is required by Mail in order to connect to the outgoing mail server tied to your email account. This screen will ask you for several pieces of information.
- SMTP Server: This is the host name of your outgoing mail server.
- User Name: This is the user name which you would use to connect to your outgoing server. Typically, this will be the same as the user name you would use to connect to your email account.
- Password: This is the password which you would use to connect to your outgoing server. Typically, this will be the same as the password you would use to connect to your email account.
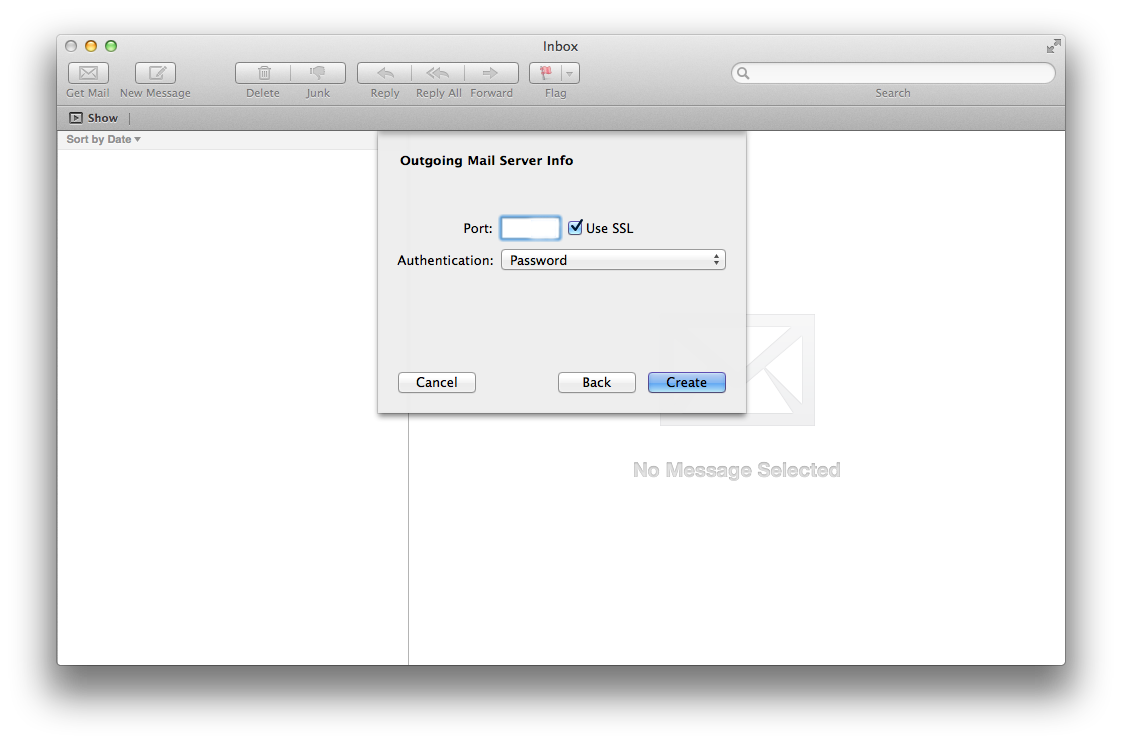
You will now be asked to enter additional outgoing mail server information to further help assist Mail in connecting to your outgoing server. This screen will ask you for several pieces of information.
- Port: The port which your outgoing mail server uses to connect.
- Use SSL: This is whether your outgoing mail server uses Secure Socket Layer (SSL) to connect.
- Authentication: This is the method of authentication which your outgoing mail server uses. The options available here are: Password, MD5, NTLM, Kerberos or None.
Once you have entered this information, press the Create button to continue with the process of adding your email account. Mail should now be able to connect to your email account. If Mail succeeds in connecting to your email account, you will be presented with the inbox to your email account. If Mail fails to connect, it will notify you that it is unable to connect and you will need to go back and verify that the email account and server information that you entered is correct.
Features
Now that you have your email account configured with Mail, there are several features which may prove helpful to you during your time using this email client.
Create Rule
The first feature which we will be looking at are rules. Rules are used to tell Mail to perform a particular action when a certain condition is met. An example of such a rule is to forward specified emails to an email address when they are received by the email client. Rules can help expand and automate what the email client does and can help tailor your email client to suit your needs.
To create a rule, you must press the Mail option on the menu bar at the top of the screen. In this drop down menu, select the Preferences option. This will open up your mail preferences for your account. In the row of options at the top of this screen, select the Rules option and it will take you to a screen which presents you with all of your current rules associated with your email account.
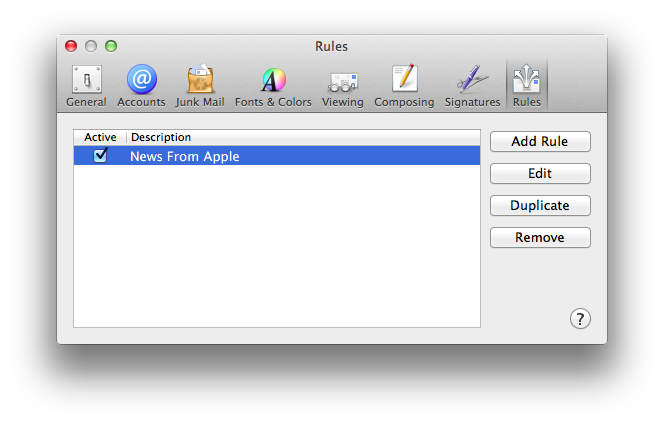
You can now press the Add Rule button to create a new rule. In the future, we can also press the Edit button to edit a rule which we have made, or press the Remove button to delete a rule which we have created. The checkbox next to each rule determines whether a rule is currently active, whereby if the checkbox is checked, the rule is active and if not, the rule is inactive.
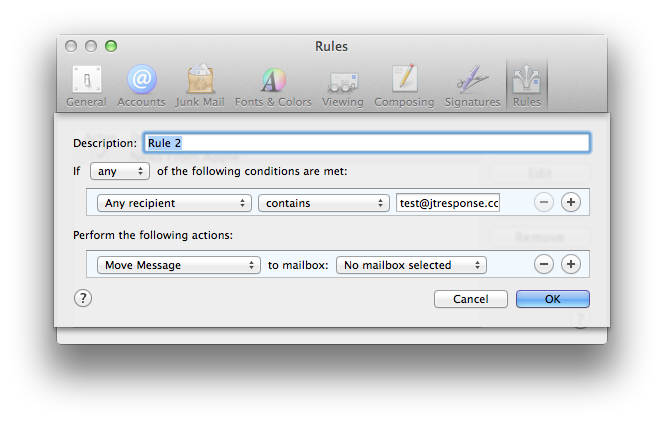
By pressing the Add Rule button, the following window will appear. This window will allow you to create a rule. At the top of the window, there is a description box. This box is what the rule will be called. You will want to enter a name here which can be used to describe the rule, so that you will know what the rule does without having to open the rule and examine the details.
The first section of this window is used to determine the conditions of the rule. The conditions are the WHEN part of the rule, determining when actions should be taken against a received message. Here you have options allowing you to determine how many conditions need to be met in order for the rule to activate, either all conditions or any conditions. In the next row, you will be able to specify rule conditions. The first drop down menu is used to specify what type of condition it is, for example when an email is received by anyone. The second drop down menu is used to further specify the condition, for example specifying when an email received by anyone contains a certain string. The third box is used to specify what the condition is searching for, for example a specific string in the email message. The plus button can be used to add an additional condition to the rule. The minus button can be used to remove a condition from the rule.
The second section of this window is used to determine the actions of the rule. The actions are the WHAT part of the rule, determining what action is taken when the conditions are met. Here you have options allowing you to determine what actions should be taken. The first drop down menu allows you to choose the type of action which will be taken. Additional options will become available depending on the type of action which you have chosen. These options help to further specify what action should be taken and help to tailor the rule to your needs and requirements. Once again, the plus button can be used to add additional actions to the rule and the minus button can be used to remove an action from your rule.
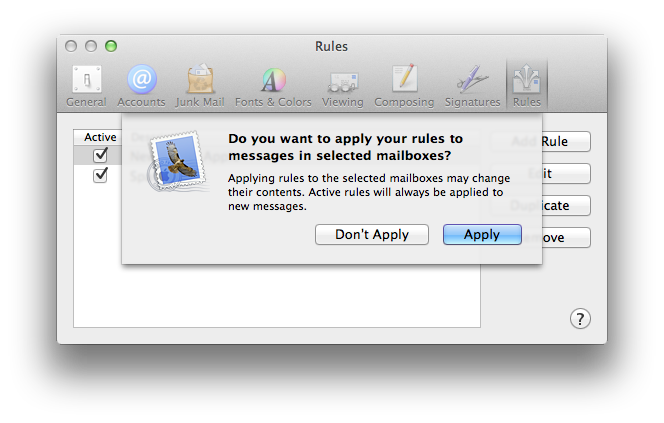
Once you are satisfied with your rule, press the OK button to save the rule to your email account. You will be prompted as to whether on not you wish to apply rules to the messages which already exist in your mailbox. If you wish to do this, it will go through all the messages in your mailbox, applying the specified actions to any messages which meet the conditions you have set.
Spam Rule Example
In this example, I will be showing you how to create a rule which will automatically deal with any spam received by your email client. The way we will be doing this is by looking into the email headers received with the message. The email header contains all the necessary information required to ensure that your email is routed to the correct email server and account, as well as providing vital information such as who the email was from. In addition to these details, the anti-spam methods put in place by the email server will add additional lines in the header to score email messages in an attempt to prevent spam. These headers are what we will be looking at in this example.
In out email server, spam is given a score based on various factors. If the spam score for a given message is greater than 6, it will be flagged as spam and appropriate actions can be taken by the email client.
To create out rule, we must once again go to the menu bar at the top of the page, select Mail and then select Preferences. Once again, we will navigate to the rules page by pressing the Rules option at the top of the window. In this rules section, we must press the New button to create a new rule.

We will name our rule Spam Filter as it seems to be a relevant name to give to a rule of this type. The header we will be looking at in messages is called X-Spam-Flag and will have a value of either YES or NO, depending on the message spam score. If the message spam score is higher than 6, the X-Spam-Flag will have a value of YES.
For our rule, we wish messages which have a X-Spam-Flag value of YES to be caught, so we must go to the first drop down and add a new header called X-Spam-Flag to let the rule know what header it will be looking at. Next we must specify that the value of this header must be equal to whatever we enter into the final box. Finally, we type YES into the final box, as this is the value we are looking for. Put together, this condition will flag messages whereby the header X-Spam-Flag is equal to YES.
Next we must specify what action we would like to be taken. In this example, we wish to move all messages marked as spam to the Junk folder. To do this we must choose an action which will move the message, which is called Move Message. Next we must specify where we wish this message to be moved to, so we select the Junk folder. Put together, this action will take the action of Move message to mailbox Junk E-mail whenever a message meets the conditions we stated above.
Our rule is now complete and we can press OK to finalise the setting of this rule.
Summary
I hope that this guide will help you to setup, configure and use Apple Mail 7.3. Most of the steps taken in this guide should be similar for other versions of Apple Mail but I cannot guarantee this, therefore if you are using a different version, please follow these steps at your own risk. If you have any questions about this guide, please comment below and I will be happy to assist you.